"여름"의 두 판 사이의 차이
Lavender328 (토론 | 기여) |
Lavender328 (토론 | 기여) |
||
| 5번째 줄: | 5번째 줄: | ||
여름에 잔디는 아직 푸르지만, 봄 잔디보다 노랗게 변합니다. 나무는 꽃이 피지 않고 대신에 선명하게 푸른 잎이 무성합니다. 때로 나비가 화면을 날아 다닙니다. 봄에 심은 작물은 모두 여름 첫 날에 시듭니다. 그러나 새로운 [[작물]], [[물고기]], [[채집|채집물]]을 얻을 수 있습니다. | 여름에 잔디는 아직 푸르지만, 봄 잔디보다 노랗게 변합니다. 나무는 꽃이 피지 않고 대신에 선명하게 푸른 잎이 무성합니다. 때로 나비가 화면을 날아 다닙니다. 봄에 심은 작물은 모두 여름 첫 날에 시듭니다. 그러나 새로운 [[작물]], [[물고기]], [[채집|채집물]]을 얻을 수 있습니다. | ||
| − | + | __TOC__ | |
==이벤트== | ==이벤트== | ||
1년 여름 3일에 일어나면 지진이 발생해서 [[스파]] 및 [[철도]] 구역에 갈 수 있습니다. | 1년 여름 3일에 일어나면 지진이 발생해서 [[스파]] 및 [[철도]] 구역에 갈 수 있습니다. | ||
| 37번째 줄: | 37번째 줄: | ||
!마을주민 | !마을주민 | ||
|- | |- | ||
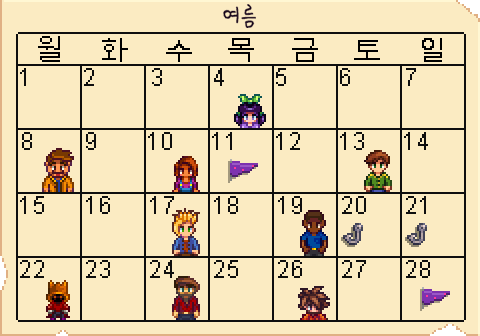
| − | |04||[[File:Jas Icon.png|link=]] [[ | + | |04||data-sort-value="8"|[[File:Jas Icon.png|link=]] [[제스]] |
|- | |- | ||
| − | |08||[[File:Gus Icon.png|link=]] [[ | + | |08||data-sort-value="1"|[[File:Gus Icon.png|link=]] [[거스]] |
|- | |- | ||
| − | |10||[[File:Maru Icon.png|link=]] [[ | + | |10||data-sort-value="4"|[[File:Maru Icon.png|link=]] [[마루]] |
|- | |- | ||
| − | |13||[[File:Alex Icon.png|link=]] [[ | + | |13||data-sort-value="6"|[[File:Alex Icon.png|link=]] [[알렉스]] |
|- | |- | ||
| − | |17||[[File:Sam Icon.png|link=]] [[ | + | |17||data-sort-value="5"|[[File:Sam Icon.png|link=]] [[샘]] |
|- | |- | ||
| − | |19||[[File:Demetrius Icon.png|link=]] [[ | + | |19||data-sort-value="2"|[[File:Demetrius Icon.png|link=]] [[드미트리어스]] |
|- | |- | ||
| − | |22||[[File:Dwarf Icon.png|link=]] [[ | + | |22||data-sort-value="3"|[[File:Dwarf Icon.png|link=]] [[드워프]] |
|- | |- | ||
| − | |24||[[File:Willy Icon.png|link=]] [[ | + | |24||data-sort-value="7"|[[File:Willy Icon.png|link=]] [[윌리]] |
|} | |} | ||
|} | |} | ||
| − | == | + | ==작물== |
{{main article|Crops#Summer Crops{{!}}Crops}} | {{main article|Crops#Summer Crops{{!}}Crops}} | ||
| − | + | 여름에는 아래와 같은 [[작물]]을 재배할 수 있습니다. "씨앗 가격"은 특별한 언급이 없는 한 [[피에르네 상점]]의 가격을 나타내는 점에 유의하세요. "계절 당 최대 수확 횟수"는 [[비료]]를 사용하지 않고 전문 직업 [[농업인]]을 선택하지 않았을 때입니다. "이익/하루"은 [[비료]]를 사용하지 않고 전문 직업 [[경작인]]을 선택하지 않았을 때입니다. | |
| − | === | + | ===단일 수확 작물=== |
{| class="wikitable sortable" style="text-align:center" id="roundedborder" | {| class="wikitable sortable" style="text-align:center" id="roundedborder" | ||
|- | |- | ||
| − | ! | + | ! 작물 !! 씨앗 가격 !! 수확까지<br>필요 일수 !! 계절 당<br>최대 수확 횟수 !! 판매 가격 !! 이익/하루 |
|- | |- | ||
| − | |style="text-align: left;"|{{name|Melon}} || data-sort-value="80"|{{Price|80}} || data-sort-value="12"|12 | + | |style="text-align: left;" data-sort-value="1"|{{name|Melon|alt=멜론}} || data-sort-value="80"|{{Price|80}} || data-sort-value="12"|12 일 || 2 || data-sort-value="250"|{{Price|250}} || data-sort-value="14.17"|≈{{Price|14.17}} |
|- | |- | ||
| − | |style="text-align: left;"|{{name|Poppy}} || data-sort-value="100"|{{Price|100}} || data-sort-value="7"|7 | + | |style="text-align: left;" data-sort-value="6"|{{name|Poppy|alt=양귀비}} || data-sort-value="100"|{{Price|100}} || data-sort-value="7"|7 일 || 3 || data-sort-value="140"|{{Price|140}} || data-sort-value="5.71"|≈{{Price|5.71}} |
|- | |- | ||
| − | |style="text-align: left;"|{{name|Radish}} || data-sort-value="40"|{{Price|40}} || data-sort-value="6"|6 | + | |style="text-align: left;" data-sort-value="2"|{{name|Radish|alt=무}} || data-sort-value="40"|{{Price|40}} || data-sort-value="6"|6 일 || 4 || data-sort-value="90"|{{Price|90}} || data-sort-value="8.33"|≈{{Price|8.33}} |
|- | |- | ||
| − | |style="text-align: left;"|{{name|Red Cabbage}} || data-sort-value="100"|{{Price|100}} || data-sort-value="9"|9 | + | |style="text-align: left;" data-sort-value="4"|{{name|Red Cabbage|alt=붉은 양배추}} || data-sort-value="100"|{{Price|100}} || data-sort-value="9"|9 일 || 3 || data-sort-value="260"|{{Price|260}} || data-sort-value="17.78"|≈{{Price|17.78}} |
|- | |- | ||
| − | |style="text-align: left;"|{{name|Starfruit}} || data-sort-value="400"|[[Oasis]]: {{Price|400}} || data-sort-value="13"|13 | + | |style="text-align: left;" data-sort-value="5"|{{name|Starfruit|alt=스타 프루츠}} || data-sort-value="400"|[[Oasis]]: {{Price|400}} || data-sort-value="13"|13 일 || 2 || data-sort-value="750"|{{Price|750}} || data-sort-value="26.92"|≈{{Price|26.92}} |
|- | |- | ||
| − | |style="text-align: left;"|{{name|Summer Spangle}} || data-sort-value="50"|{{Price|50}} || data-sort-value="8"|8 | + | |style="text-align: left;" data-sort-value="7"|{{name|Summer Spangle|alt=여름 스팽글}} || data-sort-value="50"|{{Price|50}} || data-sort-value="8"|8 일 || 3 || data-sort-value="90"|{{Price|90}} || data-sort-value="5.00"|{{Price|5}} |
|- | |- | ||
| − | |style="text-align: left;"|{{name|Sunflower}} || data-sort-value="200"|{{Price|200}} || data-sort-value="8"|8 | + | |style="text-align: left;" data-sort-value="8"|{{name|Sunflower|alt=해바라기}} || data-sort-value="200"|{{Price|200}} || data-sort-value="8"|8 일 || Summer: 3<br />Summer and [[Fall]]: 6 || data-sort-value="80"|{{Price|80}} || data-sort-value="-15.00"|{{Price|-15}} |
|- | |- | ||
| − | |style="text-align: left;"|{{name|Wheat}} || data-sort-value="10"|{{Price|10}} || data-sort-value="4"|4 | + | |style="text-align: left;" data-sort-value="3"|{{name|Wheat|alt=밀}} || data-sort-value="10"|{{Price|10}} || data-sort-value="4"|4 일 || Summer: 6<br />Summer and [[Fall]]: 13 || data-sort-value="25"|{{Price|25}} || data-sort-value="3.75"|{{Price|3.75}} |
|- | |- | ||
|} | |} | ||
| − | === | + | ===연속 수확 작물=== |
Note that each blueberry plant produces 3 [[Blueberry|Blueberries]] at harvest and each coffee plant produces 4 [[Coffee Bean]]s at harvest. | Note that each blueberry plant produces 3 [[Blueberry|Blueberries]] at harvest and each coffee plant produces 4 [[Coffee Bean]]s at harvest. | ||
{| class="wikitable sortable" style="text-align:center" id="roundedborder" | {| class="wikitable sortable" style="text-align:center" id="roundedborder" | ||
|- | |- | ||
| − | ! | + | ! 작물 !! 씨앗 가격 !! 수확까지<br>필요 일수 !! 재수확 !! 계절 당<br>최대 수확 횟수 !! 판매 가격 !! 이익/하루 |
|- | |- | ||
| − | |style="text-align: left;"|{{name|Blueberry}} || data-sort-value="80"|{{Price|80}} || data-sort-value="13"|13 | + | |style="text-align: left;" data-sort-value="2"|{{name|Blueberry|alt=블루베리}} || data-sort-value="80"|{{Price|80}} || data-sort-value="13"|13 일 || data-sort-value="4"|4 일 || 4 || data-sort-value="50"|{{Price|50}} (x3) || data-sort-value="20.8"|{{Price|20.8}} |
|- | |- | ||
| − | |style="text-align: left;"|{{name|Coffee Bean}} || [[Traveling Cart]]: {{Price|2500}} || data-sort-value="10"|10 | + | |style="text-align: left;" data-sort-value="4"|{{name|Coffee Bean|alt=커피 콩}} || [[Traveling Cart]]: {{Price|2500}} || data-sort-value="10"|10 일 || data-sort-value="2"|2 일 || Summer: 9<br />[[Spring]] and Summer: 23 || data-sort-value="15"|{{Price|15}} (x4) || data-sort-value="-20.74"|Traveling Cart (2 seasons): {{Price|-20.74}}<br>Harvested Coffee Bean/[[Dust Sprite]] (1 season): {{Price|20.77}}<br>Harvested Coffee Bean/[[Dust Sprite]] (2 seasons): {{Price|25.56}} |
|- | |- | ||
| − | |style="text-align: left;"|{{name|Corn}} || data-sort-value="150"|{{Price|150}} || data-sort-value="14"|14 | + | |style="text-align: left;" data-sort-value="3"|{{name|Corn|alt=옥수수}} || data-sort-value="150"|{{Price|150}} || data-sort-value="14"|14 일 || data-sort-value="4"|4 일 || data-sort-value="4"|Summer: 4 <br> Summer and [[Fall]]: 11 || data-sort-value="50"|{{Price|50}} || data-sort-value="1.92"|Summer only: ≈{{Price|1.92}}<br>Summer and [[Fall]]: ≈{{Price|7.41}} |
|- | |- | ||
| − | |style="text-align: left;"|{{name|Hops}} || data-sort-value="60"|{{Price|60}} || data-sort-value="11"|11 | + | |style="text-align: left;" data-sort-value="6"|{{name|Hops|alt=홉}} || data-sort-value="60"|{{Price|60}} || data-sort-value="11"|11 일 || data-sort-value="1"|1 day || 17 || data-sort-value="25"|{{Price|25}} || data-sort-value="13.52"|≈{{Price|13.52}} |
|- | |- | ||
| − | |style="text-align: left;"|{{name|Hot Pepper}} || data-sort-value="40"|{{Price|40}} || data-sort-value="5"|5 | + | |style="text-align: left;" data-sort-value="1"|{{name|Hot Pepper|alt=매운 고추}} || data-sort-value="40"|{{Price|40}} || data-sort-value="5"|5 일 || data-sort-value="3"|3 일 || 8 || data-sort-value="40"|{{Price|40}} || data-sort-value="10.77"|≈{{Price|10.77}} |
|- | |- | ||
| − | |style="text-align: left;"|{{name|Tomato}} || data-sort-value="50"|{{Price|50}} || data-sort-value="11"|11 | + | |style="text-align: left;" data-sort-value="5"|{{name|Tomato|alt=토마토}} || data-sort-value="50"|{{Price|50}} || data-sort-value="11"|11 일 || data-sort-value="4"|4 일 || 5 || data-sort-value="60"|{{Price|60}} || data-sort-value="9.26"|≈{{Price|9.26}} |
|- | |- | ||
|} | |} | ||
| − | == | + | ==채집== |
{{main article|Foraging#Summer{{!}}Foraging}} | {{main article|Foraging#Summer{{!}}Foraging}} | ||
| − | + | {{name|Rainbow Shell|class=inline}}은 여름 [[해변]]에서만 찾을 수 있습니다. 또한, 여름에는 아래와 같은 항목을 찾아 [[채집]]할 수 있습니다. | |
| − | |||
{{#lsth:Foraging|Summer}}<!--transcluded from Foraging page--> | {{#lsth:Foraging|Summer}}<!--transcluded from Foraging page--> | ||
| − | == | + | ==물고기== |
{{main article|Fish#Fish Types{{!}}Fish}} | {{main article|Fish#Fish Types{{!}}Fish}} | ||
| − | + | 특정 계절 동안만 잡을 수 있는 다양한 [[물고기]]가 있습니다. 여름에 낚을 수 있는 물고기는 아래와 같습니다. | |
| − | '' | + | ''모든 계절에 낚을 수 있는 물고기는 포함되지 않습니다.'' |
Note: Any Fish can be used for recipes with the tag "any fish" (''i.e.'', {{name|Sashimi|class=inline}}, {{name|Maki Roll|class=inline}}, {{name|Quality Fertilizer|class=inline}}). | Note: Any Fish can be used for recipes with the tag "any fish" (''i.e.'', {{name|Sashimi|class=inline}}, {{name|Maki Roll|class=inline}}, {{name|Quality Fertilizer|class=inline}}). | ||
2019년 3월 25일 (월) 14:58 판


|
불완전한 번역 이 기사 또는 섹션은 한국어로 완전히 번역되지 않았습니다.
편집하여 도움을 받을 수 있습니다. |
여름은 플레이어가 게임을 시작하고 맞는 두 번째 계절입니다. 앞선 계절은 봄이고 이어지는 계절은 가을입니다.
여름에 잔디는 아직 푸르지만, 봄 잔디보다 노랗게 변합니다. 나무는 꽃이 피지 않고 대신에 선명하게 푸른 잎이 무성합니다. 때로 나비가 화면을 날아 다닙니다. 봄에 심은 작물은 모두 여름 첫 날에 시듭니다. 그러나 새로운 작물, 물고기, 채집물을 얻을 수 있습니다.
이벤트
1년 여름 3일에 일어나면 지진이 발생해서 스파 및 철도 구역에 갈 수 있습니다.
축제
그 외
|
생일
|
작물
- 주요 문서: Crops
여름에는 아래와 같은 작물을 재배할 수 있습니다. "씨앗 가격"은 특별한 언급이 없는 한 피에르네 상점의 가격을 나타내는 점에 유의하세요. "계절 당 최대 수확 횟수"는 비료를 사용하지 않고 전문 직업 농업인을 선택하지 않았을 때입니다. "이익/하루"은 비료를 사용하지 않고 전문 직업 경작인을 선택하지 않았을 때입니다.
단일 수확 작물
| 작물 | 씨앗 가격 | 수확까지 필요 일수 |
계절 당 최대 수확 횟수 |
판매 가격 | 이익/하루 |
|---|---|---|---|---|---|
| 12 일 | 2 | ≈ | |||
| 7 일 | 3 | ≈ | |||
| 6 일 | 4 | ≈ | |||
| 9 일 | 3 | ≈ | |||
| Oasis: |
13 일 | 2 | ≈ | ||
| 8 일 | 3 | ||||
| 8 일 | Summer: 3 Summer and Fall: 6 |
||||
| 4 일 | Summer: 6 Summer and Fall: 13 |
연속 수확 작물
Note that each blueberry plant produces 3 Blueberries at harvest and each coffee plant produces 4 Coffee Beans at harvest.
| 작물 | 씨앗 가격 | 수확까지 필요 일수 |
재수확 | 계절 당 최대 수확 횟수 |
판매 가격 | 이익/하루 |
|---|---|---|---|---|---|---|
| 13 일 | 4 일 | 4 | ||||
| Traveling Cart: |
10 일 | 2 일 | Summer: 9 Spring and Summer: 23 |
Traveling Cart (2 seasons): Harvested Coffee Bean/Dust Sprite (1 season): Harvested Coffee Bean/Dust Sprite (2 seasons): | ||
| 14 일 | 4 일 | Summer: 4 Summer and Fall: 11 |
Summer only: ≈ Summer and Fall: ≈ | |||
| 11 일 | 1 day | 17 | ≈ | |||
| 5 일 | 3 일 | 8 | ≈ | |||
| 11 일 | 4 일 | 5 | ≈ |
채집
- 주요 문서: Foraging
![]() 무지개 껍데기은 여름 해변에서만 찾을 수 있습니다. 또한, 여름에는 아래와 같은 항목을 찾아 채집할 수 있습니다.
Foraging
무지개 껍데기은 여름 해변에서만 찾을 수 있습니다. 또한, 여름에는 아래와 같은 항목을 찾아 채집할 수 있습니다.
Foraging
물고기
- 주요 문서: Fish
특정 계절 동안만 잡을 수 있는 다양한 물고기가 있습니다. 여름에 낚을 수 있는 물고기는 아래와 같습니다.
모든 계절에 낚을 수 있는 물고기는 포함되지 않습니다.
Note: Any Fish can be used for recipes with the tag "any fish" (i.e., ![]() 회,
회, ![]() 마키 롤,
마키 롤, ![]() 고급 비료).
고급 비료).
| Image | Name | Description | Price | Location | Time | Season | Weather | Size (inches) | Difficulty & Behavior | Base XP | Used In |
|---|
Livin' Off The Land Tips
| 계절 | |
|---|---|
| 계절 | 봄 • 여름 • 가을 • 겨울 |