"숙성용 나무통"의 두 판 사이의 차이
(새 문서: {{Infobox |name = Cask |source = Crafting |ingredients = {{name|Wood|20}}{{name|Hardwood|1}} |sellprice = Cannot be sold |recipe = Final Farmhouse upgrade }...) |
|||
| 1번째 줄: | 1번째 줄: | ||
{{Infobox | {{Infobox | ||
| − | | | + | |image = Cask |
| − | |source = [[ | + | |source = [[제작]] |
|ingredients = {{name|Wood|20}}{{name|Hardwood|1}} | |ingredients = {{name|Wood|20}}{{name|Hardwood|1}} | ||
| − | |sellprice = | + | |sellprice = 판매불가 |
| − | |recipe = | + | |recipe = [[농가]]의 마지막 업그레이드 했을 시 |
}} | }} | ||
| − | + | '''숙성용 나무통'''은 [[장인 생산품]]을 사용하는 [[제작#장인 설비|장인 설비]]입니다. [[와인]]이나 [[치즈]]를 넣으면 시간이 지날 수록 품질과 가격이 상승합니다. | |
| − | + | [[도끼]], [[호미]], 또는 [[곡괭이]]를 사용하면 일반, 은별, 금별 품질의 아이템을 완전히 숙성되기 전에 숙성용 나무통에서 언제든 꺼낼 수 있습니다. | |
| − | + | 숙성용 나무통은 생산품을 "이리듐별" 품질로 만들 수 있습니다. 이리듐별은 가장 높은 품질 등급이며 아이템의 가격을 2배로 만들어줍니다. 아이템 종류에따라 더 걸릴 수도, 덜 걸릴 수도있습니다. 와인이 가장 오래 걸리는 데, 일반 와인에서 이리듐 등급이 되려면 2 계절의 숙성시간이 필요합니다. | |
| − | + | 숙성용 나무통은 어디에든 설치할 수 있지만 생산품을 숙성시키려면 [[농가#업그레이드|지하 저장고]]에 설치해야합니다. | |
| − | + | 이리듐등급이 일반 등급의 가치의 2배 밖에 되지 않아, 비싼 가격으로 주목받는 스타프루트도 수익이 많이 생기지 않습니다. 56일이 지나 완성히 숙성된 스타프루트의 가격이 2250으로 하루에 40골드 정도 수익이 납니다. 하지만 이는 2 계절동안 두는 것을 고려하면 매우 적은 수익입니다. 스타프루트 와인 125통이면 하루당 5000 골드의 수익이 생깁니다. | |
| − | == | + | ==배치 전략== |
| − | + | 지하 저장고에는 33개의 숙성용 통이있습니다. 이동 결로를 남기고 가득 채웠을 때 125개까지 설치할 수 있습니다. | |
| − | + | 물론 통으로 완전히 채울 수도 있습니다. 출구 방향으로 움직이면서 설치하면 총 189개를 설치할 수 있으며 이를 만드는데 156개의 단단한 나무와 3120개의 나무가 필요합니다. 숙성이 끝나 수확하려면 반대로 제일 먼 곳까지 통을 부수면서 길을 내며 들어가야합니다. 이 방법은 시간이 소요되므로 가장 비싼 생산품(예: [[스타프루트]] 또는 [[고대 과일]] 와인)일 때만 사용하는것이 바람직합니다. | |
| − | + | 모든 배치방법은 아래의 [[숙성용 나무통#사진|사진]]에 있습니다. | |
| − | + | [[조작|컨트롤러]]나 모바일 유저들은 마우스와 키보드를 사용하는 것보다 모서리의 통에 접근하기 힘들다는 얘기가 있으니 참고하시기 바랍니다. | |
| − | == | + | ==숙성 가격== |
| − | <!-- | + | <!--주의: 이 문단은 장인 생산품 페이지에 연결되어 있습니다.--> |
<section begin="caskagedvalues" /> | <section begin="caskagedvalues" /> | ||
{| class="wikitable sortable" id="roundedborder" | {| class="wikitable sortable" id="roundedborder" | ||
| − | ! | + | !사진 |
| − | ! | + | !이름 |
| − | ! | + | !설명 |
| − | ! | + | !재료 |
| − | ! | + | !기본 품질 |
| − | ! | + | !은별 (x 1.25) |
| − | ! | + | !금별 (x 1.5) |
| − | ! | + | !이리듐별 (x 2) |
|- | |- | ||
|[[File:Wine.png]] | |[[File:Wine.png]] | ||
| − | |[[ | + | |[[와인]] |
|{{Description|Wine}} | |{{Description|Wine}} | ||
| − | | | + | |모든 [[과일]] (1) |
| | | | ||
{| | {| | ||
|{{Quality|Wine||32}} | |{{Quality|Wine||32}} | ||
| − | |3 x [[ | + | |3 x [[과일]] 기본 가격 |
|} | |} | ||
| | | | ||
{| | {| | ||
|{{Quality|Wine|silver|32}} | |{{Quality|Wine|silver|32}} | ||
| − | |class="no-wrap"|(3 x | + | |class="no-wrap"|(3 x 기본) x 1.25 |
|- | |- | ||
| − | | colspan=2 class="no-wrap"| '' | + | | colspan=2 class="no-wrap"| ''소요시간: 14 일'' |
|} | |} | ||
| | | | ||
{| | {| | ||
|{{Quality|Wine|gold|32}} | |{{Quality|Wine|gold|32}} | ||
| − | |class="no-wrap"|(3 x | + | |class="no-wrap"|(3 x 기본) x 1.50 |
|- | |- | ||
| − | | colspan=2 | '' | + | | colspan=2 | ''소요시간: 14 일''<br />''총: 28 일'' |
|} | |} | ||
| | | | ||
{| | {| | ||
|{{Quality|Wine|iridium|32}} | |{{Quality|Wine|iridium|32}} | ||
| − | |class="no-wrap"|(3 x | + | |class="no-wrap"|(3 x 기본) x 2 |
|- | |- | ||
| − | | colspan=2 | '' | + | | colspan=2 | ''소요시간: 28 일''<br />''총: 56 일'' |
|} | |} | ||
|- | |- | ||
|[[File:Pale Ale.png]] | |[[File:Pale Ale.png]] | ||
| − | |[[ | + | |[[페일 에일]] |
|{{Description|Pale Ale}} | |{{Description|Pale Ale}} | ||
|{{name|Hops|1}} | |{{name|Hops|1}} | ||
| | | | ||
{| | {| | ||
| − | |{{Quality|Pale Ale||32}}|| | + | |{{Quality|Pale Ale||32}}||300골드 |
|} | |} | ||
| | | | ||
| 81번째 줄: | 81번째 줄: | ||
|{{Quality|Pale Ale|silver|32}}||375g | |{{Quality|Pale Ale|silver|32}}||375g | ||
|- | |- | ||
| − | | colspan=2 | '' | + | | colspan=2 | ''소요시간: 9 일'' |
|} | |} | ||
| | | | ||
{| | {| | ||
| − | |{{Quality|Pale Ale|gold|32}}|| | + | |{{Quality|Pale Ale|gold|32}}||450골드 |
|- | |- | ||
| − | | colspan=2 | '' | + | | colspan=2 | ''소요시간: 8 일''<br />''총: 17 일'' |
|} | |} | ||
| | | | ||
{| | {| | ||
| − | |{{Quality|Pale Ale|iridium|32}}|| | + | |{{Quality|Pale Ale|iridium|32}}||600골드 |
|- | |- | ||
| − | | colspan=2 | '' | + | | colspan=2 | ''소요시간: 17 일''<br />''총: 34 일'' |
|} | |} | ||
|- | |- | ||
|[[File:Beer.png]] | |[[File:Beer.png]] | ||
| − | |[[ | + | |[[맥주]] |
|{{Description|Beer}} | |{{Description|Beer}} | ||
|{{name|Wheat|1}} | |{{name|Wheat|1}} | ||
| | | | ||
{| | {| | ||
| − | |{{Quality|Beer||32}}|| | + | |{{Quality|Beer||32}}||200골드 |
|} | |} | ||
| | | | ||
{| | {| | ||
| − | |{{Quality|Beer|silver|32}}|| | + | |{{Quality|Beer|silver|32}}||250골드 |
|- | |- | ||
| − | | colspan=2 | '' | + | | colspan=2 | ''소요시간: 7 일'' |
|} | |} | ||
| | | | ||
{| | {| | ||
| − | |{{Quality|Beer|gold|32}}|| | + | |{{Quality|Beer|gold|32}}||300골드 |
|- | |- | ||
| − | | colspan=2 | '' | + | | colspan=2 | ''소요시간: 7 일''<br />''총: 14 일'' |
|} | |} | ||
| | | | ||
{| | {| | ||
| − | |{{Quality|Beer|iridium|32}}|| | + | |{{Quality|Beer|iridium|32}}||400골드 |
|- | |- | ||
| − | | colspan=2 | '' | + | | colspan=2 | ''소요시간: 14 일<br />''총: 28 일'' |
|} | |} | ||
|- | |- | ||
|[[File:Mead.png]] | |[[File:Mead.png]] | ||
| − | |[[ | + | |[[벌꿀 술]] |
|{{Description|Mead}} | |{{Description|Mead}} | ||
|{{name|Honey|1}} | |{{name|Honey|1}} | ||
| | | | ||
{| | {| | ||
| − | |{{Quality|Mead||32}}|| | + | |{{Quality|Mead||32}}||200골드 |
|} | |} | ||
| | | | ||
{| | {| | ||
| − | |{{Quality|Mead|silver|32}}|| | + | |{{Quality|Mead|silver|32}}||250골드 |
|- | |- | ||
| − | | colspan=2 | '' | + | | colspan=2 | ''소요시간: 7 일'' |
|} | |} | ||
| | | | ||
{| | {| | ||
| − | |{{Quality|Mead|gold|32}}|| | + | |{{Quality|Mead|gold|32}}||300골드 |
|- | |- | ||
| − | | colspan=2 | '' | + | | colspan=2 | ''소요시간: 7 일''<br />''총: 14 일'' |
|} | |} | ||
| | | | ||
{| | {| | ||
| − | |{{Quality|Mead|iridium|32}}|| | + | |{{Quality|Mead|iridium|32}}||400골드 |
|- | |- | ||
| − | | colspan=2 | '' | + | | colspan=2 | ''소요시간: 14 일''<br />''총: 28 일'' |
|} | |} | ||
|- | |- | ||
|[[File:Cheese.png]] | |[[File:Cheese.png]] | ||
| − | |[[ | + | |[[치즈]] |
|{{Description|Cheese}} | |{{Description|Cheese}} | ||
|{{name|Milk|1|class=inline}} or{{name|Large Milk|1}} | |{{name|Milk|1|class=inline}} or{{name|Large Milk|1}} | ||
| | | | ||
{| | {| | ||
| − | |{{Quality|Cheese||32}}|| | + | |{{Quality|Cheese||32}}||230골드 |
|} | |} | ||
| | | | ||
{| | {| | ||
| − | |{{Quality|Cheese|silver|32}}|| | + | |{{Quality|Cheese|silver|32}}||287골드 |
|- | |- | ||
| − | | colspan=2 | '' | + | | colspan=2 | ''소요시간: 3 일'' |
|} | |} | ||
| | | | ||
{| | {| | ||
| − | |{{Quality|Cheese|gold|32}}|| | + | |{{Quality|Cheese|gold|32}}||345골드 |
|- | |- | ||
| − | | colspan=2 | '' | + | | colspan=2 | ''소요시간: 4 일''<br />''총: 7 일'' |
|} | |} | ||
| | | | ||
{| | {| | ||
| − | |{{Quality|Cheese|iridium|32}}|| | + | |{{Quality|Cheese|iridium|32}}||460골드 |
|- | |- | ||
| − | | colspan=2 | '' | + | | colspan=2 | ''소요시간: 7 일''<br />''총: 14 일'' |
|} | |} | ||
|- | |- | ||
|[[File:Goat Cheese.png]] | |[[File:Goat Cheese.png]] | ||
| − | |[[ | + | |[[염소 치즈]] |
|{{Description|Goat Cheese}} | |{{Description|Goat Cheese}} | ||
|{{name|Goat Milk|1|class=inline}} or{{name|Large Goat Milk|1}} | |{{name|Goat Milk|1|class=inline}} or{{name|Large Goat Milk|1}} | ||
| | | | ||
{| | {| | ||
| − | |{{Quality|Goat Cheese||32}}|| | + | |{{Quality|Goat Cheese||32}}||400골드 |
|} | |} | ||
| | | | ||
{| | {| | ||
| − | |{{Quality|Goat Cheese|silver|32}}|| | + | |{{Quality|Goat Cheese|silver|32}}||500골드 |
|- | |- | ||
| − | | colspan=2 | '' | + | | colspan=2 | ''소요시간: 3 일'' |
|} | |} | ||
| | | | ||
{| | {| | ||
| − | |{{Quality|Goat Cheese|gold|32}}|| | + | |{{Quality|Goat Cheese|gold|32}}||600골드 |
|- | |- | ||
| − | | colspan=2| '' | + | | colspan=2| ''소요시간: 4 일''<br />''총: 7 일'' |
|} | |} | ||
| | | | ||
{| | {| | ||
| − | |{{Quality|Goat Cheese|iridium|32}}|| | + | |{{Quality|Goat Cheese|iridium|32}}||800골드 |
|- | |- | ||
| − | | colspan=2 | '' | + | | colspan=2 | ''소요시간: 7 일''<br />''총: 14 일'' |
|} | |} | ||
|}<section end="caskagedvalues" /> | |}<section end="caskagedvalues" /> | ||
| − | == | + | ==사진== |
<gallery mode=packed widths=100% heights=100%> | <gallery mode=packed widths=100% heights=100%> | ||
| − | Cellar_Inside.png| | + | Cellar_Inside.png|[[농가]] 업그레이드 후 생긴 지하 저장고 모습 |
| − | Optimal_cellar_layout.png| | + | Optimal_cellar_layout.png|마우스/키보드 사용자를 위한 최적의 배치: 125개를 접근할 수 있게 배치한 모습 |
| − | Optimal cellar layout mobile.png| | + | Optimal cellar layout mobile.png|컨트롤러/모바일 사용자를 위한 최적의 배치: 118개를 접근할 수 있게 배치한 모습 |
| − | Max_cellar_layout.png| | + | Max_cellar_layout.png|지하 저장고의 최대치인 189개를 설치한 모습. |
</gallery> | </gallery> | ||
| − | == | + | ==역사== |
| − | {{history|1.1| | + | {{history|1.1|소개.}} |
| − | {{history|1.3| | + | {{history|1.3|수확할 준비가 된 숙성용 나무통을 도구로 치면 게임이 깨지는 버그가 수정됩니다.}} |
| − | {{history|1.4| | + | {{history|1.4|더 이상 숙성용 나무통에 이리듐 품질의 아이템을 넣을 수 없습니다. 플레이어의 [[인벤토리]]와 [[상자]]에서 숙성용 나무통을 중첩할 수 있게 수정됩니다.}} |
{{NavboxEquipment}} | {{NavboxEquipment}} | ||
| − | [[Category: | + | [[Category:제작 아이템]] |
[[de:Reifefass]] | [[de:Reifefass]] | ||
2020년 2월 19일 (수) 13:30 판
| 숙성용 나무통 | |
| 지하실에 설치해서 술이나 치즈를 숙성시킬 수 있습니다. | |
| 정보 | |
| 입수처 | 제작 |
| 판매가격 | 판매 불가 |
| 제작 | |
| 제작법 입수처 | 농가의 마지막 업그레이드 했을 시 |
| 재료 | |
숙성용 나무통은 장인 생산품을 사용하는 장인 설비입니다. 와인이나 치즈를 넣으면 시간이 지날 수록 품질과 가격이 상승합니다.
도끼, 호미, 또는 곡괭이를 사용하면 일반, 은별, 금별 품질의 아이템을 완전히 숙성되기 전에 숙성용 나무통에서 언제든 꺼낼 수 있습니다.
숙성용 나무통은 생산품을 "이리듐별" 품질로 만들 수 있습니다. 이리듐별은 가장 높은 품질 등급이며 아이템의 가격을 2배로 만들어줍니다. 아이템 종류에따라 더 걸릴 수도, 덜 걸릴 수도있습니다. 와인이 가장 오래 걸리는 데, 일반 와인에서 이리듐 등급이 되려면 2 계절의 숙성시간이 필요합니다.
숙성용 나무통은 어디에든 설치할 수 있지만 생산품을 숙성시키려면 지하 저장고에 설치해야합니다.
이리듐등급이 일반 등급의 가치의 2배 밖에 되지 않아, 비싼 가격으로 주목받는 스타프루트도 수익이 많이 생기지 않습니다. 56일이 지나 완성히 숙성된 스타프루트의 가격이 2250으로 하루에 40골드 정도 수익이 납니다. 하지만 이는 2 계절동안 두는 것을 고려하면 매우 적은 수익입니다. 스타프루트 와인 125통이면 하루당 5000 골드의 수익이 생깁니다.
배치 전략
지하 저장고에는 33개의 숙성용 통이있습니다. 이동 결로를 남기고 가득 채웠을 때 125개까지 설치할 수 있습니다.
물론 통으로 완전히 채울 수도 있습니다. 출구 방향으로 움직이면서 설치하면 총 189개를 설치할 수 있으며 이를 만드는데 156개의 단단한 나무와 3120개의 나무가 필요합니다. 숙성이 끝나 수확하려면 반대로 제일 먼 곳까지 통을 부수면서 길을 내며 들어가야합니다. 이 방법은 시간이 소요되므로 가장 비싼 생산품(예: 스타프루트 또는 고대 과일 와인)일 때만 사용하는것이 바람직합니다.
모든 배치방법은 아래의 사진에 있습니다.
컨트롤러나 모바일 유저들은 마우스와 키보드를 사용하는 것보다 모서리의 통에 접근하기 힘들다는 얘기가 있으니 참고하시기 바랍니다.
숙성 가격
| 사진 | 이름 | 설명 | 재료 | 기본 품질 | 은별 (x 1.25) | 금별 (x 1.5) | 이리듐별 (x 2) | ||||||||||||||
|---|---|---|---|---|---|---|---|---|---|---|---|---|---|---|---|---|---|---|---|---|---|
| 와인 | 음주는 절제해서. | 모든 과일 (1) |
|
|
|
| |||||||||||||||
| 페일 에일 | 음주는 적당히. |
|
|
|
| ||||||||||||||||
| 맥주 | 음주는 절제해서. |
|
|
|
| ||||||||||||||||
| 벌꿀 술 | 벌꿀을 발효시켜 만든 술. 음주는 절제해서. |
|
|
|
| ||||||||||||||||
| 치즈 | 기본적인 치즈. |
|
|
|
| ||||||||||||||||
| 염소 치즈 | 염소 우유로 만든 부드러운 치즈. |
|
|
|
| ||||||||||||||||
사진
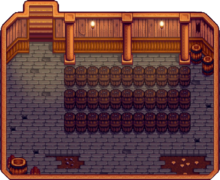
농가 업그레이드 후 생긴 지하 저장고 모습
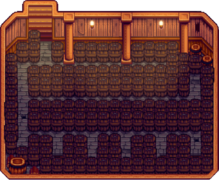
마우스/키보드 사용자를 위한 최적의 배치: 125개를 접근할 수 있게 배치한 모습
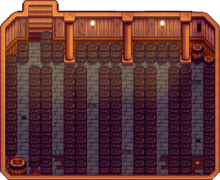
컨트롤러/모바일 사용자를 위한 최적의 배치: 118개를 접근할 수 있게 배치한 모습
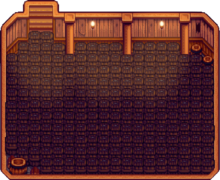
지하 저장고의 최대치인 189개를 설치한 모습.


역사
- 1.1: 소개.
- 1.3: 수확할 준비가 된 숙성용 나무통을 도구로 치면 게임이 깨지는 버그가 수정됩니다.
- 1.4: 더 이상 숙성용 나무통에 이리듐 품질의 아이템을 넣을 수 없습니다. 플레이어의 인벤토리와 상자에서 숙성용 나무통을 중첩할 수 있게 수정됩니다.
| 장비 | ||
|---|---|---|
| 장인 장비 | 마요네즈 기계 • 양봉장 • 절임통 • 치즈 착제기 • 물레 • 술통 • 착유기 • 숙성용 나무통 | |
| 정제 장비 | 용광로 • 수액 채취기 • 중형 수액 채취기 • 숯 가마 • 재활용 기계 • 피뢰침 • 슬라임 알 압착기 • 슬라임 부화기 • 지렁이 통 • 씨앗 생성기 • 결정생성기 • 목재파쇄기 • 정동석 분쇄기 • 타조알 부화기 • 태양 전지판 • 뼈 제분기 | |
| 농사 | 비료 | 기본 비료 • 고급 비료 • 디럭스 비료 • 성장 촉진제 • 디럭스 성장 촉진제 • 하이퍼 성장 촉진제 • 기본 보습 토양 • 고급 보습 토양 • 디럭스 보습 토양 • 나무용 비료 |
| 스프링클러 | 스프링클러 • 고급 스프링클러 • 이리듐 스프링클러 • 고압 노즐 • 비료 분사기 | |
| 그 외에 | 허수아비 • 희귀한 허수아비 • 디럭스 허수아비 • 정원용 화분 | |
| 낚시 | 미끼 | 미끼 • 야생 미끼 • 자석 • 마법 미끼 |
| 낚시 도구 | 함정 찌 • 회전식 미끼 • 무거운 찌 • 코르크 찌 • 보물사냥꾼 • 꾸며진 회전식 미끼 • 가시 돋친 낚시바늘 • 고급 찌 • 호기심 미끼 | |
| 그 외에 | 게잡이 통발 | |
| 폭탄 | 폭탄 • 체리 폭탄 • 거대 폭탄 • 폭발성 탄약 | |
| 울타리 | 울타리 문 • 나무 울타리 • 돌 울타리 • 철 울타리 • 단단한 나무 울타리 | |
| 보관함 | 보관함 • 석조 보관함 • 미니-냉장고 • 주니모 보관함 | |
| 표지판 | 나무 표지판 • 돌 표지판 • 어두운 표지판 | |
| 기타 | 도구들 • 작업대 • 재봉틀 • 전화기 • 계단 • 야외 요리 키트 • 커피 메이커 • 농장 컴퓨터 • 미니-주크박스 • 미니 오벨리스크 • 몬스터 사향 • 요정 가루 • 호퍼 | |